Headless WordPress + Next.js 15 Guide (2026)
Headless WordPress with Next.js 15 is the most powerful stack for building production-ready websites in 2026. You connect WordPress as your content backend through WPGraphQL or the WordPress REST API, with Next.js rendering the frontend — giving you the editorial flexibility of WordPress combined with the performance and SEO superpowers of Next.js, at a scale that works from solo projects to enterprise applications.
If you have ever searched for this setup, you have probably run into half-finished tutorials, broken dependency errors, or CORS nightmares at 2 AM. This guide fixes all of that. Whether you are a developer building production-grade setups, an agency focused on performance, or a founder migrating from legacy WordPress, this blueprint covers the exact tools, API strategy, caching layer, and errors you will encounter — before you ever encounter them.
Here is what this guide covers:
- Why headless WordPress + Next.js is the right stack for 2026
- The exact tools and plugins to install (and which ones to avoid)
- REST API vs WPGraphQL — which one to use and when
- Handling CORS, authentication, and image optimization
- Caching strategies — the layer most developers skip entirely
- Vercel vs Netlify — a real comparison for this specific stack
- Common errors and how to solve them before they happen
 Headless WordPress with Next.js 15 — Complete Setup Guide 2026
Why Headless WordPress + Next.js is the Right Stack in 2026
WordPress powers over 43% of all websites on the internet. It has the richest content ecosystem — custom post types, ACF fields, Yoast SEO, WooCommerce, and a plugin library of over 60,000 tools. But its traditional PHP-rendered frontend is slow and hard to scale for demanding modern UX expectations.
Next.js, on the other hand, is built for what the modern web demands — App Router architecture, React Server Components, Incremental Static Regeneration (ISR), Edge Runtime, and native image optimization. It is the go-to framework for performance, SEO, and developer velocity.
Together, they form a headless CMS architecture: WordPress manages content, Next.js renders it. You get the best of both worlds — editorial power and frontend performance. The result is a site that scores 95+ on Lighthouse, ranks well on Google, and is a pleasure to build.
Why Not Use Traditional WordPress?
| Feature | Traditional WP | Headless (Next.js) |
|---|---|---|
| Performance | Slow (PHP rendering) | Very fast (static + edge) |
| SEO | Good | Excellent |
| Flexibility | Limited by themes | Full creative control |
| Scaling | Hardware-intensive | Effortless (Serverless) |
💡 While WordPress is our focus, modern headless alternatives like Strapi or Sanity are also great choices depending on your data requirements. However, WordPress remains the king of editorial experience for large-scale content teams.
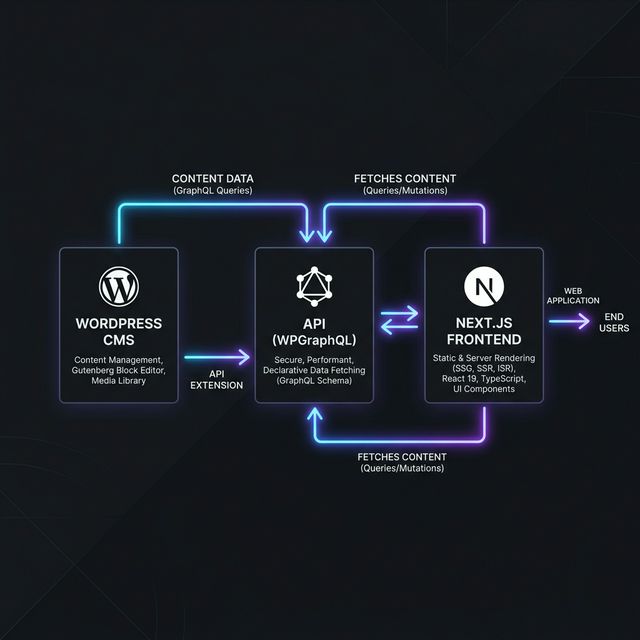 The 2026 Headless WordPress + Next.js 15 App Router Architecture: A unified stack for content management, API-driven data delivery, and high-performance static generation with ISR.
How the Architecture Works (Simple Breakdown)
- WordPress stores and manages content via its familiar interface.
- WPGraphQL exposes structured data via a high-performance GraphQL API.
- Next.js fetches data during build or request time using React Server Components.
- The hosting platform serves static + dynamic pages globally via its Edge Network.
- Webhooks trigger instant revalidation (ISR) when content is updated.
This separation allows for maximum frontend performance without sacrificing editorial flexibility.
The Tools You Need (2026 Stack)
| Layer | Tool | Version |
|---|---|---|
| Frontend Framework | Next.js | 15 (App Router) |
| Styling | Tailwind CSS | v4 |
| GraphQL Client | graphql-request | Latest |
| CMS | WordPress | 6.7+ |
| API Layer | WPGraphQL | v1.28+ |
| Custom Fields | ACF Pro | Latest |
| SEO Sync | WPGraphQL Yoast SEO | Latest |
| Caching | Next.js Data Cache + Redis Object Cache | — |
| Webhook Revalidation | WP Webhooks plugin | Latest |
| Frontend Host | Vercel (recommended) / Netlify | — |
| WordPress Host | Cloudways / Kinsta | — |
| Auth | Application Passwords + next-auth | — |
How to Set Up Headless WordPress with Next.js 15 (Quick Start)
- Install WordPress locally (using LocalWP) or on a cloud host like Cloudways or Kinsta.
- Install Core Plugins: WPGraphQL, Advanced Custom Fields (ACF), and WPGraphQL for ACF.
- Create Next.js App: Run
npx create-next-app@latestin your terminal. - Install GraphQL Client: Run
npm install graphql-request graphql. - Fetch Data: Connect to your
/graphqlendpoint inside a Next.js Server Component. - Deploy: Push your code to GitHub and connect it to Vercel for automatic deployments.
📝 Environment Variable Management: Ensure your
.env.localpoints to your local WordPress instance (e.g.,http://headless.localfor LocalWP, orhttp://localhost:8080for Docker/MAMP) during development. When deploying to Vercel, update theWP_API_URLto your production domain. Using distinct environment variables for staging and production is critical to prevent data cross-pollution.
REST API vs WPGraphQL — The Real Answer
This is the question every developer asks. Here is the direct answer: use WPGraphQL for any project beyond a simple blog.
When to Use the WordPress REST API
The REST API is built into WordPress core. No extra plugins needed. It is ideal when:
- You are fetching simple, flat data — posts, pages, categories
- You need maximum compatibility and minimal setup
- Your team is not familiar with GraphQL syntax
- You are building a quick prototype or MVP
A basic REST fetch in Next.js looks like this:
// app/blog/page.tsx
// Next.js 15: searchParams is now a Promise
export default async function BlogPage({
  searchParams,
}: {
  searchParams: Promise<{ page?: string }>;
}) {
  const { page } = await searchParams;
  const res = await fetch(
    `${process.env.WP_API_URL}/wp-json/wp/v2/posts?_embed&per_page=10&page=${page || 1}`,
    { next: { revalidate: 60 } }
  );
  const posts = await res.json();
  return <PostList posts={posts} />;
}
When to Use WPGraphQL
WPGraphQL lets you fetch exactly the fields you need — no over-fetching. It is essential when:
- You have custom post types and ACF fields
- You need nested relational data (posts → author → avatar → categories)
- You want to pull Yoast SEO metadata in a single query
- You are building complex page templates with multiple data sources
A sample WPGraphQL query:
query GetPostBySlug($slug: String!) {
  post(id: $slug, idType: SLUG) {
    title
    content
    date
    featuredImage {
      node {
        sourceUrl
        altText
      }
    }
    seo {
      title
      metaDesc
      opengraphImage {
        sourceUrl
      }
    }
    author {
      node {
        name
        avatar {
          url
        }
      }
    }
  }
}
The verdict: Use REST for simple projects. Use WPGraphQL the moment you have ACF fields, custom post types, or SEO metadata requirements. The GraphQL approach scales better, performs better, and makes your Next.js data layer significantly cleaner.
SEO Pro Tip: Headless Metadata Sync
To sync Yoast SEO data from WordPress to Next.js 15, use the generateMetadata function. This ensures search engines see exactly what your content team configured in the WordPress editor.
// app/blog/[slug]/page.tsx
import { Metadata } from 'next';

export async function generateMetadata({
  params
}: {
  params: Promise<{ slug: string }>
}): Promise<Metadata> {
  // CRITICAL: params is now a Promise in Next.js 15
  const { slug } = await params;
  const post = await getPostMetadata(slug); // Your function to fetch Yoast data via WPGraphQL

  return {
    title: post.seo.title,
    description: post.seo.metaDesc,
    openGraph: {
      images: post.seo.opengraphImage?.sourceUrl
        ? [{ url: post.seo.opengraphImage.sourceUrl }]
        : [],
    },
  };
}
Setting Up CORS — The Error You Will Hit First
The single most common error developers face in this stack: CORS policy blocking your Next.js app from fetching WordPress data.
Add the following to your WordPress functions.php or a custom plugin:
// Allow Next.js frontend origin
add_action('init', function () {
  $allowed_origins = [
    'http://localhost:3000',
    'https://yourdomain.com',
  ];

  $origin = $_SERVER['HTTP_ORIGIN'] ?? '';

  if (in_array($origin, $allowed_origins)) {
    header("Access-Control-Allow-Origin: $origin");
    header("Access-Control-Allow-Methods: GET, POST, OPTIONS");
    header("Access-Control-Allow-Headers: Content-Type, Authorization");
  }

  if ($_SERVER['REQUEST_METHOD'] === 'OPTIONS') {
    status_header(200);
    exit();
  }
});
Pro-tip for Local Development: When working locally, your origin is likely http://localhost:3000. Ensure both your local URL and your production Vercel URL are in the $allowed_origins array. This prevents the common "it works on my machine but not on production" error when your Next.js frontend transitions from local coding to live deployment.
Important: Never set Access-Control-Allow-Origin: * in production. Always allowlist your specific Next.js domain.
⚠️ If you are hosted on Cloudways or Kinsta, server-level Nginx configurations may override
functions.phpsettings. If CORS errors persist, check your hosting dashboard or contact support to ensure theAccess-Control-Allow-Originheader is correctly reflected at the server level.
Image Optimization — Do Not Skip This
WordPress stores images on its own server. When you pull a sourceUrl from the API and use it in Next.js, configure next.config.ts (or next.config.js) to allow images from your WordPress domain:
// next.config.ts
import type { NextConfig } from "next";

const nextConfig: NextConfig = {
  images: {
    remotePatterns: [
      {
        protocol: 'https',
        hostname: 'your-wordpress-site.com',
        pathname: '/wp-content/uploads/**',
      },
    ],
  },
};

export default nextConfig;
Then use next/image instead of a plain <img> tag in your components:
import Image from 'next/image';

<Image
  src={post.featuredImage.node.sourceUrl}
  alt={post.featuredImage.node.altText}
  width={1200}
  height={630}
  priority={isHero}
/>
This gives you automatic WebP conversion, lazy loading, and responsive sizing — critical for Core Web Vitals and Lighthouse scores.
💡 Warning — Image Server Load: While Next.js optimizes images, the initial request still hits your WordPress server to fetch the original file. For high-traffic sites, this can slow down your entire WordPress instance during heavy image processing. To offload this entirely, consider using an external image loader (like Cloudinary, Imgix, or Akamai) with
next/image. This ensures your WordPress server stays fast and focused solely on delivering data.
Authentication — Securely Accessing Restricted Content
If your project requires fetching restricted data (e.g., drafts, private posts, or admin-only fields), Application Passwords (built into WordPress core) are the most straightforward solution.
For Server-to-Server Communication
Application Passwords work best for Server-to-Server communication. They are designed for machine-to-machine auth where your Next.js server acts as the authenticated client.
⚠️ Security Must-Have — Public Login Safety: If you are building a "Member Area," membership portal, or WooCommerce store where users must log in, never use a single administrative Application Password. Sharing one set of admin credentials for all users is a massive security risk that exposes your entire backend. For public-facing logins, you must use a dedicated solution like JWT Authentication for WP REST API, WP Headless Login, or NextAuth.js to ensure each user receives their own unique, secure session token.
To use Application Passwords server-side, enable them in wp-admin > Users > Profile. On the Next.js side:
// Fetch with Basic Auth using Application Password
const credentials = Buffer.from(`username:application_password`).toString('base64');

const res = await fetch(`${process.env.WP_API_URL}/wp-json/wp/v2/posts`, {
  headers: {
    Authorization: `Basic ${credentials}`,
  },
});
Store credentials in .env.local and never expose them to the client. Always use server-side fetching (Server Components or Route Handlers) for authenticated requests.
The WordPress Preview Workflow (Draft Mode)
One of the most common questions from content teams is: "How do I see my post before I hit publish?" In a headless setup, this is handled via Next.js Draft Mode.
- The Trigger: Create a secure Route Handler (e.g.,
/api/draft) in Next.js that validates a secret token from WordPress. - The Magic: When validated, the route calls
const { enable } = await draftMode(); enable();, which sets a temporary cookie in the editor's browser. - The Result: Next.js detects this cookie and bypasses the static cache for that session, fetching fresh "draft" data from the WordPress API so editors can preview changes in real-time.
Caching Strategy — The Layer Most Developers Skip
Caching is where the real performance gap opens up between a headless site that is fast and one that is truly production-grade. In this stack, you have four distinct caching layers to think about. Get all of them right, and your site handles traffic spikes without breaking a sweat.
Layer 1 — Next.js Data Cache (fetch-level)
Next.js 15 has a built-in data cache that wraps the native fetch API. In Next.js 15, fetch calls are uncached by default. You must explicitly opt into caching using the next option inside fetch:
// Cache indefinitely until manually revalidated via tag
const res = await fetch(`${process.env.WP_API_URL}/wp-json/wp/v2/posts`, {
  next: { tags: ['posts'] },
});

// Cache for 60 seconds, then revalidate in the background (ISR behavior)
const res = await fetch(`${process.env.WP_API_URL}/wp-json/wp/v2/posts`, {
  next: { revalidate: 60 },
});

// Opt out of caching entirely — always fresh data
const res = await fetch(`${process.env.WP_API_URL}/wp-json/wp/v2/posts`, {
  cache: 'no-store',
});
Use tags for content-driven invalidation — the recommended approach for WordPress. Use revalidate as a time-based safety net. Use no-store only for user-specific or real-time data.
Layer 2 — On-Demand Revalidation via WordPress Webhook
When a WordPress editor publishes or updates a post, you want the Next.js cache to flush immediately — not after a 60-second timer. This is where on-demand revalidation paired with a WordPress webhook becomes essential.
Step 1 — Create a revalidation API route in Next.js:
// app/api/revalidate/route.ts
import { revalidateTag } from 'next/cache';
import { NextRequest, NextResponse } from 'next/server';

export async function POST(req: NextRequest) {
  const secret = req.headers.get('x-revalidate-secret');

  if (secret !== process.env.REVALIDATE_SECRET) {
    return NextResponse.json({ message: 'Invalid secret' }, { status: 401 });
  }

  const { tag } = await req.json();
  revalidateTag(tag); // e.g. 'posts', 'pages', 'categories'

  return NextResponse.json({ revalidated: true, tag });
}
Step 2 — Set up the WordPress webhook:
Install the WP Webhooks plugin. Create a new webhook trigger with:
- Trigger:
save_post(fires on all post saves. To limit it to specific post types only, usesave_post_postorsave_post_{custom_post_type}. For most blogs,save_post_postis the right trigger.) - URL:
https://your-nextjs-site.com/api/revalidate - Custom header:
x-revalidate-secret: your_secret_here - Body:
{ "tag": "posts" }
Now every time an editor hits Publish in WordPress, Next.js flushes only the posts cache tag — no full site rebuild, no stale content on the frontend.
Layer 3 — Full Route Cache (Static Pages)
For pages that do not change frequently — like individual blog post pages — generate them statically at build time.
Next.js 15 Note: Be sure to await params in your page component to maintain compatibility with the new asynchronous request APIs.
// app/blog/[slug]/page.tsx
export const revalidate = 300;

export default async function Page({
  params
}: {
  params: Promise<{ slug: string }>
}) {
  // CRITICAL: await params before using it in Next.js 15
  const { slug } = await params;
  const post = await getPost(slug);
  return <PostContent post={post} />;
}

export async function generateStaticParams() {
  const posts = await getPosts();
  return posts.map((post) => ({ slug: post.slug }));
}
This produces static HTML served from the edge — zero server compute per request, sub-100ms page loads globally. Combined with the webhook in Layer 2, you get static speed with dynamic freshness.
Layer 4 — WordPress-Side API Caching with Redis
The WordPress REST API and WPGraphQL endpoints are worth caching at the server level too. On managed hosts like Kinsta or WP Engine, object caching is handled automatically. On Cloudways or self-managed VPS setups, add Redis Object Cache to WordPress.
Install the Redis Object Cache plugin and connect it to a Redis instance on your server. This caches WordPress database queries so that repeated API calls — like fetching the same post 100 times during a traffic spike — hit Redis in memory instead of MySQL on disk. Response times on the WordPress API drop from 300–500ms to under 10ms for cached queries.
Caching Decision Map
| Page Type | Recommended Strategy |
|---|---|
| Blog post (static content) | generateStaticParams + ISR revalidate |
| Homepage / listing page | ISR with tag-based webhook revalidation |
| Search results | cache: 'no-store' — always fresh |
| User dashboard / account | cache: 'no-store' — user-specific |
| Category / tag archive | ISR + revalidate tag on post publish |
| WordPress API layer | Redis Object Cache on the server |
Hosting — Vercel vs Netlify for This Stack
Both platforms can host your Next.js frontend, but they handle things differently. Here is a direct comparison:
| Feature | Vercel | Netlify |
|---|---|---|
| Next.js ISR support | Native, zero config | Via adapter — works well |
revalidateTag support | Full, native | Supported — test carefully |
next/image optimization | Native on edge CDN | Via Netlify Image CDN |
| Draft Mode (WordPress preview) | Native | Via adapter |
| Edge Middleware | Mature, global | Supported |
| Free tier bandwidth | 100GB/month | 100GB/month |
| Pro plan pricing | $20/member/month | $19/member/month |
| New Next.js feature availability | Day one | Adapter lag |
| Best for | Next.js-first projects | Teams with existing Netlify investment |
Recommendation: If this project is your primary deployment and Next.js is your core framework, use Vercel. The native ISR, revalidateTag, and next/image integration work exactly as documented without any adapter friction. Choose Netlify if your team already uses it across multiple projects and wants to consolidate infrastructure or platform-level forms.
Next.js 15: Security & Breaking Changes
Next.js 15 introduces several key changes that impact your headless stack:
- Async Request APIs: As shown in our examples,
params,searchParams, andcookies()are now asynchronous. Alwaysawaitthem to prevent runtime crashes. - Server Actions Security: Improved protection against unauthorized execution. If you build contact forms using Server Actions in Next.js 15, these enhancements provide a secure bridge to your WordPress backend.
- Improved Caching Defaults: Next.js 15 shifts toward
no-storeby default for many fetch requests. Explicitly userevalidatetags for consistent ISR performance.
Common Errors and How to Fix Them
Next.js 15 + Headless WordPress: The "No-Panic" Checklist
| Common Error | Likely Culprit | The 60-Second Fix |
|---|---|---|
| TypeError: fetch failed | Incorrect Environment Variable | Ensure WP_API_URL uses https and has no trailing slash. |
| Hostname not configured | Missing remotePatterns | Add your WordPress domain to the images object in next.config.ts exactly as it appears in the URL. |
| Stale Content / No Updates | Webhook Mismatch | Ensure the WP Webhook hits /api/revalidate with the correct x-revalidate-secret and the tag matches your fetch call. |
| 401 Unauthorized (REST) | Auth or Permission Error | Re-encode username:application_password in Base64 and ensure the WP user has read/edit_posts capabilities. |
| CORS Policy Blocked | Missing Origin Headers | Add your Next.js domain to the $allowed_origins array in the WordPress functions.php. |
| Internal Server Error (GQL) | Plugin Conflict | Deactivate SEO or old ACF plugins one by one to isolate the schema breaker. |
Limitations You Should Know
While the headless approach offers immense benefits, it is not always the right choice for every project. Acknowledge these trade-offs before migrating:
- Higher Development Complexity: Headless setups require separate frontend and backend expertise compared to traditional WordPress themes.
- DevOps Knowledge Required: You will need to handle deployment pipelines, API caching strategies, and environment configurations.
- Workflow Setup: Features like live previews and draft mode require additional configuration (e.g., Next.js Draft Mode) to sync across the stack.
- Overkill for Simple Sites: For very small or personal websites with minimal traffic, the traditional WordPress monolith may still be the more efficient choice.
Addressing these limitations upfront builds trust and ensures your team is prepared for the migration.
We Have Built This — and It Works in Production
This is not a theoretical guide.
At CorgenX, we have architected and shipped multiple real-world production projects on this exact stack — operating at scale for clients across SaaS, e-commerce, and content-heavy businesses. The results are consistent: sub-second page loads, 95+ Lighthouse scores, and content teams that never have to leave the WordPress editor they already know.
Explore our Project Portfolio to see this architecture in action.
One of our recent client projects — a high-traffic content platform — migrated from a traditional WordPress monolith to this headless architecture. The outcome: a 3× improvement in page load speed, a 40% increase in organic search impressions within 90 days, and an editorial workflow the content team described as the smoothest they had ever experienced.
We handle the full stack — Next.js architecture, WordPress API setup, caching layer configuration, Vercel deployment, and ongoing performance optimization. You get a production system built by a team that has already solved every problem in this guide.
Ready to build your headless WordPress + Next.js project the right way?
If you are planning a new build or moving an existing WordPress site to a headless architecture, we would love to hear about your project. We have done this before — we know exactly where the pitfalls are, and we know how to ship fast without cutting corners.
👉 Get a free architecture review — we’ll analyze your use case and suggest the best stack (no obligation).
FAQs
What is headless WordPress?
Headless WordPress separates the CMS backend (where content is managed) from the frontend presentation layer. WordPress handles content storage and editorial workflows via its REST API or WPGraphQL, while a separate frontend — in this case Next.js — fetches that content and renders it. This gives you WordPress’s familiar editor with full control over the frontend stack and performance.
Is Next.js 15 fully compatible with headless WordPress?
Yes. Next.js 15 works seamlessly with headless WordPress through both the WP REST API and WPGraphQL. React Server Components, the App Router, Incremental Static Regeneration (ISR), and on-demand revalidation all integrate cleanly with WordPress as a data source.
Should I use WPGraphQL or the WordPress REST API?
WPGraphQL is recommended for most Next.js projects because it lets you fetch exactly the fields you need in a single request, reducing over-fetching and improving performance. The REST API is a simpler option if your team is less familiar with GraphQL or if you have existing REST-based tooling. Both work — WPGraphQL just gives you more precision and efficiency at scale.
What is ISR and how does it work with headless WordPress?
Incremental Static Regeneration (ISR) allows Next.js to statically generate pages at build time and then revalidate them in the background when content changes. In a headless WordPress setup, you configure a WordPress webhook to trigger revalidatePath() or revalidateTag() whenever a post is published or updated — so your pages stay current without a full site rebuild.
Is headless WordPress good for SEO?
Yes, it can be better than traditional WordPress for SEO when implemented correctly. Next.js handles server-side rendering and static generation natively, giving you fast page loads and full control over metadata, Open Graph tags, structured data, and sitemaps — all factors that influence rankings. The main risk is metadata sync: you must ensure title tags, canonical URLs, and Open Graph images are properly piped from WordPress to Next.js on every page.
What are the main advantages of headless WordPress over a traditional WordPress site?
The key advantages are performance (sub-second page loads via static generation), developer flexibility (use any frontend technology), security (the WordPress admin is not publicly exposed), and scalability (the frontend can be deployed on a global CDN like Vercel independently of the WordPress backend). The trade-off is architectural complexity — it requires more setup than a standard WordPress theme.
How do I handle preview mode for draft posts in headless WordPress?
Next.js provides a Draft Mode API (previously called Preview Mode) that allows authenticated users to view unpublished WordPress draft content in real time. You configure a WordPress preview URL that points to your Next.js site with a secret token, and Next.js fetches the draft version of the post directly from the WordPress API, bypassing the static cache.
Built with Next.js 15 App Router, WordPress 6.7, WPGraphQL v1.28, Tailwind CSS v4, and deployed on Vercel.
Related Articles
Ready to Scale?
Our high-performance web solutions and SEO strategies are designed to deliver results.
Check out our services